The Potato Growing Process Is Dictated By Location, Climate, Soil, Skill & The Variety, Which Determines Planting & Harvesting Times. But Though I’ve Grown Them Commercially, & As A Gardener, I Advise With Trepidation As Everyone Claims Too Be An Expert!
Table of Contents
Over the years I have written a lot on how to grow potatoes, and will reference those articles, as I write this quick overview.
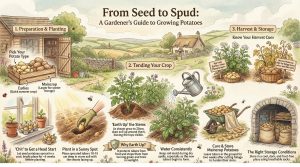
This process gives potatoes a head start. It is essential for Earlies and is often recommended for Maincrop.
Freshly harvested potatoes
When: This depends on your last frost dates. It can be from Late January if you are in very sheltered southern coast location or as late as March/April in some locations. The best advice is about 6 weeks before planting. And the planting date is to allow enough time so that the breaking growth appears AFTER the last frosts.
How: Place seed potatoes in egg boxes or a tray with the “rose end” (the end with the most eyes) facing up. Keep them in a cool, bright, frost-free place (approx. 10°C).
Goal: You want short, dark green shoots (approx. 2–3 cm). Rub off all but the 3 or 4 strongest shoots before planting.
Soil Preparation For Potatoes
Potatoes thrive in an open, sunny site.
Traditionally, dig in plenty of well-rotted manure or garden compost in autumn or early winter,
Avoid soil that is waterlogged or prone to late frosts.
The soil should ideally be deep and friable. Though it is possible to grow the No Dig way where the seed potatoes are placed on the soil and covered in organic matter. This can be compost, lawn mowings etc. I grow some with lawn mowings each year and get very good crops using this method. It is very quick and easy and prevents my back aching as I get older!
On the cliff sides a mile from where I live they used to plant “Branscombe potatoes” on the “plats” as early as Feb 24th and had new potatoes in the London markets as early as they did from Jersey.Though less than a mile from my home the microclimate is very different to the one in my gardenwhere this date would ensure crop failure.
3. Planting Guide
Wait until the soil has warmed up and the risk of hard frost has passed. That date varies by location so the dates here are indicative only. See the note below the chart.
Type
Planting Time (UK)
Spacing (In Row)
Spacing (Between Rows)
Harvest Time
First Earlies
Mid to Late March
30 cm
60 cm
June – July
Second Earlies
Early to Mid April
30 cm
60 cm
July – August
Maincrop
Mid to Late April
40 cm
75 cm
Aug – Oct
The actual planting date between first earlies and main crop is often stated as above. But it fails to recognise a gardening truth. All of them can go in on the same day if required. The date spacing just spreads the work load AND gives that extra bit of weather security should there be a very late frost. The nature of the crop will spread the harvest dates in any case.
A Simple Method:
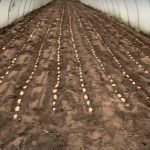
Dig a V-shaped trench or individual holes approx. 10–15 cm (4–6 in) deep.
Place the tubers with the “chits” (shoots) facing upwards.
Cover carefully with soil and handle gently to avoid snapping the shoots. The shoots should however be very short to avoid damage. On farms they have to go through a planting machine so are never long.
If frost is forecast after planting, you could cover the soil with fleece or even straw. This will give bit of extra assurance .. but not a great deal. Don’t over-rely on it.
4. Care and Maintenance
Earthing Up: As the green shoots appear and reach about 10-20 cm high, draw soil up around the stems with a hoe or spade to form a ridge. Leave only the top few centimetres of foliage visible.
Why? This protects shoots from late frosts (though the tops are still vulnerable) and prevents the developing tubers from turning green and toxic due to light exposure.
Watering: Critical during dry spells. Tubers need consistent moisture to swell. Water thoroughly, this is often advised as being at the base of the plant, especially when tubers are starting to form (size of a marble). This is when they are most responsive to irrigation. Crops can of course grown with no irrigation and many of the commercial crops I have grown have not been watered. But it needs good moisture retentive soils to start with.
Going back to the old advice of watering at the base of the plant I cannot but wonder why it is advised when farmers use overhead irrigation that thoroughly water the plant and soil. It can only be as part of a blight preventative process. Blight loves high humidity and hence water needs to be done when the risk is low. Farmers know when to avoid watering to lessen blight risk but gardeners don’t always know or have the same intuition.
Feeding: Generally not vital if the soil was manured. On poorer soils, apply a general-purpose organic fertiliser before planting.
5. Harvesting and Storage
Earlies: Ready when the flowers open or buds drop. Scrape away a little soil to check tuber size (aim for hen’s egg size). Harvest as needed; they do not store well.
Maincrop: Wait until the foliage (haulms) turns yellow and dies back. Cut the foliage down and leave the tubers in the ground for 10–14 days to let the skins harden (cure).
Storage: Lift on a dry day. Discard any damaged tubers. Store the healthy ones in breathable hessian or paper sacks in a cool, dark, frost-free place.
Common Potato Growing Issues
Potato Blight: The most serious problem. Leaves develop dark brown patches with a rotting smell, and tubers rot.
Action: If blight hits, cut away all foliage immediately to prevent it travelling down to the tubers. Leave tubers in the ground for 2 weeks before lifting. If you caught it too late they will have started to rot and there is no point digging them!
Scab: Causes rough, corky patches on the skin. It is cosmetic and does not affect taste. Keep soil well-watered to prevent it.
To get a downloadable copy of the infographic click the link below..